
Welcome,
My name is Jérôme Demers the 17 years old malicious toy modifier...
(*)
< )
(-)
The goal of this contest is to modify ( hack ) in anyway the Wowwee-Hasbro BIOBugs created by Mark Tilden.
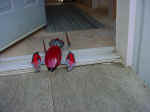
I first got my Bio-bug at SEARS. I was just walking in the toys section when my instinct told me to turn left to the lego section, so I turned, looked around and saw the Ultimate BIO-BUGS.I was so excited, that there was about 20 minutes of starring at the box and another 20 minutes of hesitation between the GREEN or the RED Bio-bug. I finally took the red Bio-bug.
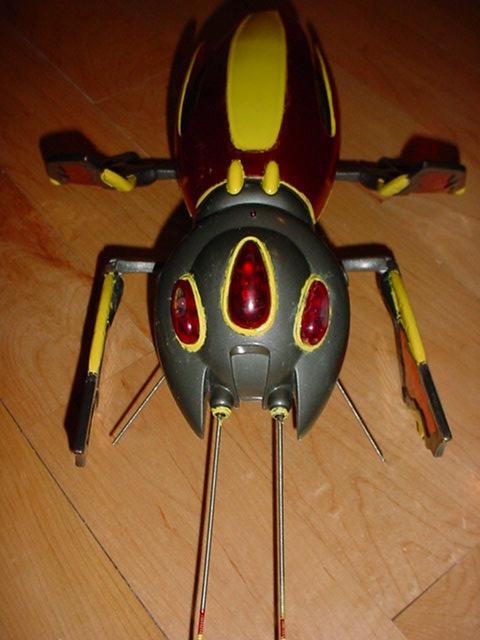
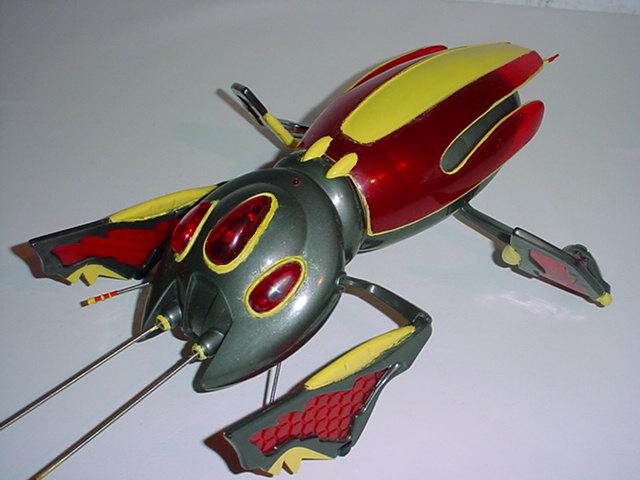
To see my bio-bug hack, close your eyes and >>click here<< to see my complete bio-bug hack. Be sure to close your eyes for about 10 second so the pictures can load. ( The image is 37K ) To see more pictures of the finished product, just scroll down.
Click here to see a gallery of my NON modify bio-bugs.
Click here to see a video ( 986 Ko ) of the walking and climbing bio-bug. ( I was pushing the fast foward button while recording this video ( picture below ))
And here is a really cool animation of a bio-bug battle ( Check out below ).
| Bio-bugs battle |
| Sound version is recommanded ( Need macromedia Flash plug-in for both animation ) | |||||
| 1-Click here to see the bio-bugs battle with sound ( 113 Ko ) | |||||
| 2-Click here to see the bio-bugs battle with NO sound ( 84 Ko ) | |||||
If you don't see a image on this page just press refresh to reload the entire page.
Before entering my bio-bug hack, I want to tell you that hacking a bio-bug is not easy. It is really hard to start the hack and have the courage to drill, cut and melt the bio-bug. Went you look at the main circuit board, you just cannot figure a way to "play" with the component and behaviour. It is so small and fragile that you can easily break your bio-bug. It is hard to start a hack with NO clue or documentation. You mainly have to start with your imagination.
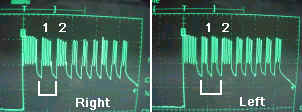
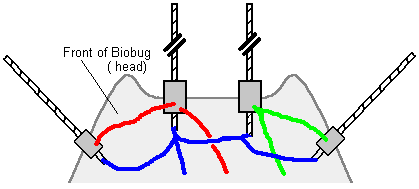
A friend and I have measured the frequency of the infrared signal emitter for the remote control. We thought it would be nice to control the robot by sending signals to the bio-bug.
Here are the pictures of the oscilloscope. ( Each image are 640x480 and aproximately 150Ko in size )
Over here, you can see the right and left signal. You can see that in the right signal the frequency 1 and 2 are large. In the left signal there is the same two large frequencies ( 1 and 2 ) but the first one is divided in two.
 |
 |
 |
||
| Food signal | Right signal | Left signal | ||
 |
 |
|||
| Fast walking signal | Training signal |
I asked my friend if he could reproduce these two frequencies and he tought it this possible with two 555 timers ( or one 556 ) to send different frequency ( see below ). But after asking a electronic teacher and friends, he realised that it was more difficult to reproduce this frequency.

I wanted to make a light seeking bio-bug by sending "fake" signals to the eyes. I could have used a HERBIE circuit that would control each 556 dual timer independently.
Over here I will describe my hack:
NB: You can click on any miniature picture to see the original image. All images are 640x480 and approximately 60Ko in size.
> First hack:
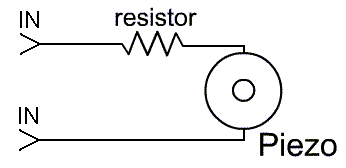
First of all, everybody was talking about the loud noise of the Bio-bug ( I think it is not *really* annoying ). So I got this idea to change the volume of my Bio-bug. There is more then one solution for this problem, like putting a resistor in serie with the piezo ( Figure 1)
I decided to add a variable resistor to have a real volume control. I got this cool idea concerning the volume control, I tought I could control ON/OFF, volume control and Normal tone ( Figure 2 ). But it won't be cool if you can't hear the bio-bug screaming if the volume control is OFF, so I add a LED to see is reaction.
| Figure 1 |
|
|
|||||
|
|
|||||
| Figure 2 |
| Flash version is recommanded | |||||
| 1-Click here to see the volume control circuit ( 6K ). ( Need macromedia Flash plug-in ) | |||||
| 2-Click here if you don't have macromedia plug-in ( GIF version ) | |||||
 |
 |
 |
||
| The sound control | Outside the controller | The "OFF" led |
> Second hack:
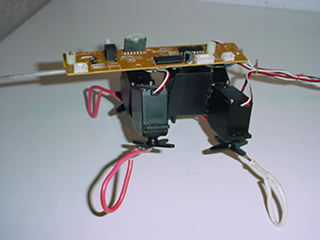
The second hack concerns the mechanic aspect of the bug. My robot was walking around in the kitchen, it got stuck when it encountered a chair leg. The chair leg got in between the head and the front leg. So I added some sensors between the head and the leg to avoid any object to enter the .
This hack seems quite easy but NO, it is not! I had some difficulties while testing my NEW sensor because I forgot to connect the blue wire to the main board while testing the new sensor ( Figure 3 ). As you can suspect, it didn't work until I finally found the problem after installing a new type of sensor.
| Figure 3 |
|
|
|||||
|
|
|||||
Over here, you can see my first and second prototype of sensor ( Figure 4 ). The second version of my sensor is made of .22 catridge bullet. Each prototype sensor uses Solarbotics surgical-grade stainless-stell spring tubing. Really nice and COOL :-)
| Figure 4 |
|
sensor #1 |
sensor #2 |
|||||
|
|
||||||
 |
 |
 |
 |
|||
| Making the hole | Getting a idea of the design | The first sensor | Another view |
For drilling the hole, I took Scotch tape to protect the plastic.
For the sensor, I wanted to use a LED to the end of the sensor. I realized that it would not be good to add voltage to the input of the bio-bug.


For connecting the NEW sensor, I added a connecter to disconnect the top part from the body. This will help if I need to dismantle my bio-bug for tuning.

Here is a video of my modified bio-bug getting out of a chair leg attack. Click on image to see the video and try to look at the "OFF" led flashing on top of the head.
| Figure 5 |
|
|
|||||
|
|
|||||
> Third hack:
My final hack is a aesthetic hack. I don't know where I got this idea from but I knew I wanted a flashy yellow paint. I even thought it would be cool to have a blue and white bio-bug ( Figure 6 )
| Figure 6 |
|
|
|||||
|
|
|||||
I have painted my bio-bug with a aerosol can. I didn't have yellow model paint in hand. Aerosol is not really the best for that kind of job because it eats ( dissolve ) the bio-bug plastic. I had to be really careful in this paint job. On third picture ( cleaning the biobug ) my dad and I cleaned the bio-bug with brake cleaner. We took Q-tips to clean the excess yellow.
 |
 |
 |
| Painting the cover | Preparing for paint | Cleaning the biobug |
Here are some pictures of the final product.


I hope you enjoyed my bio-bug modifications.
Brought to you by Jérôme Demers, the malicious bio-bug hacker...
©¿©¬
|
The reincarnation of vBug 1.5 |
||
|
CLICK HERE to find the story
|

